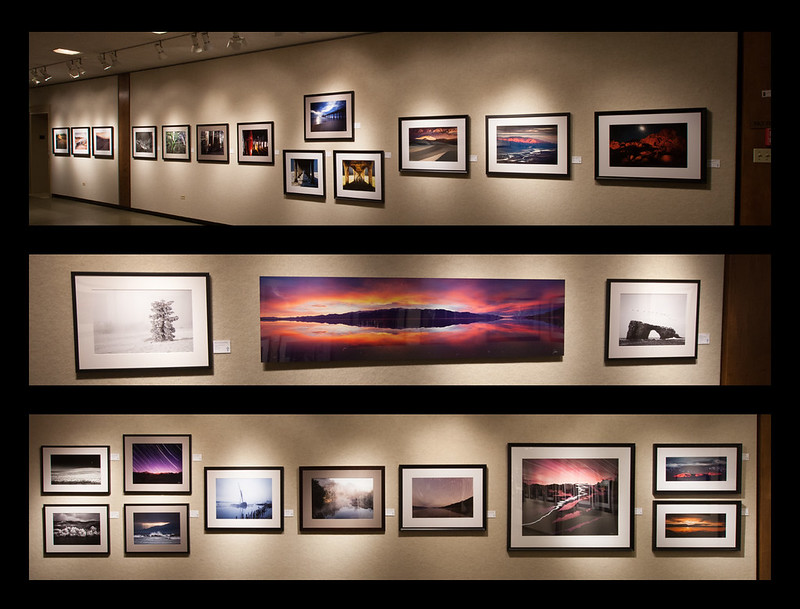
I’ll be attending for the opening reception on September 7th, 5:30-7:15pm and on September 21st during the Fort Wayne Museum of Art Trolley Tour. I hope to see you there!
Also, I’ve set up an online store using Shopify. Currently, there are only posters, postcards and prints of the 97 Switchbacks At Night listed. I hope to add more soon as it gets up and running. Check out the store here:
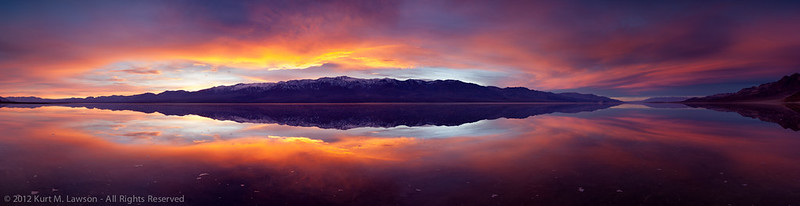
While getting ready to print some of my all time favorite photos, I took a closer look at the panorama I simply called “WOW” back in January 2011. “WOW” was pretty much the only thought I could think as I witnessed the most intense and amazing sunset spectacle yet to appear before this photographer’s eyes. The setting is Badwater, the lowest point in North America in the heart of Death Valley National Park. Unusually heavy rains hammered the valley in December 2010, resulting in a flood of this lowest point, which is typically a salt flat with polygonal fractures forming miniature salty techtonic plates as far as the eye can see. Instead of that interesting and otherworldly scene, a dramatically different landscape greeted me. The entire basin was covered with a temporary lake. This was an opportunity I was waiting for. I fell in love with Death Valley after my first visit in January 2008 with my friend and fellow photographer Robert Mance. Not long after that first visit, I immersed myself in reading about this park and it’s amazing landscapes. During that research I discovered the flood of February 2005. Images of a flooded Badwater amazed me, and so did the thought of kayaking across this miniature lake, something no humans probably had ever done. I vowed to keep an eye on the weather in the future, and winter 2010-2011 would give me the chance to capture this rare event. You can read more about my January 2011 adventures in my Tales of a Flooded Badwater posts – part 1 and part 2. My second night on the first trip to a flooded Badwater would yield this panorama. “Wow” is what I said to myself repeatedly out loud into the emptiness of the valley. “Thank you!” I shouted to the landscape as I trudged back to my car through the 8 inches of salty water.
I thought I’d use this image as an example of how I will approach photographic post processing, as well as taking you through the steps I took with the “Wow” panorama to arrive at the final result. Lets begin.
For me photography is largely an interpretive art. The fun for me is in capturing something amazing that happens, and then sharing my interpretation of that through the artistic tools of photography. I try to keep things real when photographing landscapes. What I mean by that is that the landscape itself existed at the time I clicked the shutter. The quality of light is all there before the camera, recorded onto a piece of film or recorded by the electrical impulses of a CMOS or CCD sensor.
Photography is not how I make my living. I make my living as a compositor working on visual effects for movies. Think of it as “animated Photoshop” where images get combined in sequence to show movement rather than the single frame static scenes of photography. For a living, I make fake images. We call the “visual effects shots.” They might be totally transparent things that you wouldn’t notice unless someone told you – the removal of unwanted freckles on a face, the removal of reflections from a car, sky replacements, etc – or it could be completely obvious like adding the Lizard in a scene from the forthcoming Amazing Spiderman movie. All of these things may look real, but the end image is something that is no longer captured as far as I am concerned. It has crossed a line into something new that is created in post processing. Clearly, this is something highly subjective, so you are going to have to figure out where the line is for you.
It’s pretty simple for most images to me. Did I capture this scene, or did I create it later on my computer? The world of digital photography allows for limitless digital modification of images. People can remove trees they don’t like, change the sky, radically change and enhance the colors, composite elements together endlessly. If I took a photo from Death Valley and replaced the sky with one I shot at El Matador State Beach in Malibu, CA, can I still call it a “Death Valley” photograph? For me the answer is a definitive no. If I add in an over-sized moon dominating the sky of my image in Death Valley, is that something I captured or created? I’ve seen a lot of other photographers add moons to their shots, often huge moons that are astronomically and optically impossible. I think there are many people who view moons in landscape photographs with some suspicion due to the prevalence of bad moon composites. The bottom line: is this an image of a landscape that existed at the time I clicked the shutter, or is this something that could exist. For me a photography is all about the former, and the later is the realm of composites, digital art and visual effects shot. I want to capture reality with my photography. My day job of visual effects is for fake images. This is my philosophy. If you want to read an article arguing for more artistic license, Alain Briot has this article about Artistic License over at Luminous Landscape. Also, please note that composites are not the sole realm of digital photography. Jerry Uelsmann has done truly amazing composites in the darkroom long before photoshop became a verb.
This doesn’t mean I reject outright a lot of these tools that are available. Instead, I use them sometimes to overcome limitations of the camera system I’m using. The biggest example of this is images with huge dynamic range. In a few very select cases I have combined two exposures to lower the exposure of the sky when there is a scene of a dark foreground. This image from the Racetrack in Death Valley is an example. I used an underexposed bracket to bring back some detail where the sun had overexposed: (click for bigger)
This used the compositing power of photoshop to simply compress the dynamic range a little. The scene was not fundamentally altered in any way, and now is closer to what I saw. But wait! That’s black and white! That brings me to:
Black and White Photography
Black and white photography will always be a more liberal interpretation of a scene than color photography. My childhood photography hero Ansel Adams captured amazing scenes and then used his masterful darkroom skills to extract an amazing “performance” from the negative “score.” I will sometimes do some light dodging and burning (increasing or decreasing exposure selectively) in some of my photographs, mostly with black and white interpretations which is not a way the human eye sees. You still wont’ find me adding moons that were not there and skies that were shot at a different place and time. If we use the Ansel Adams analogy I mentioned about the negative being like a musical score and the performance is the print, then I would say I am not going to change out whole sections of music by inserting parts of other scores.
Star Trails and other things the human eye just can’t see
Some photography is by its very nature fundamentally different than the way the human eye sees. I am rather fond of star trail photographs, and the human eye can’t see star trails looking up at the night sky. All my star trail shots are captured at once. I haven’t yet tried to use the “stacking” technique of combining multiple exposures into one star trail image. For really long exposures I just use film.
Panoramas
Finally, we get to my example image, which is a panorama from the flooded Badwater in Death Valley where we began. One compositing technique I have no problem using is combining multiple exposures into a panorama. The result is a super high resolution image that would exceed the capabilities of the camera. The trick is that you have to be quick about it when the light is changing. My technique is to set the camera on manual and carefully and quickly fire off 3 bracket exposures, then rotate the camera, repeat. Manual focus is also important. I’ve had numerous panoramas ruined by changing focus between frames. I always bracket exposures because I don’t trust myself, and I may want the option to restore some detail in an otherwise blown out section of the frame.
I have just gone through and completely reprocessed the “Wow” panorama as I get ready to print it (the print will be 18 by 70 inches). Why reprocess it? Well with the arrival of Lightroom 4.x, I’ve noticed that images just look better. Lightroom 4 does a much better job with highlights, rolling them off more gracefully. I felt that this image could benefit from some of that. Here are my brackets. The base exposure was 0.8 seconds at f/16 iso 200. A UV filter was on 16-35mm f2.8L II lens at 24mm. Bracket exposures were +/- 2 stops. Brackets for central panorama image The 7 frames of this panorama
This is the three raw files with all settings at default in Lightroom. From here I selected the “normal” exposure. This frame seemed to be the best balance of exposure. Looking at the histogram, the image data bunched up to the right without hitting the wall, meaning no pixels are exceeding the range the sensor could record. Having the pixels bunched up to the right also tends to result in an image with less noise as digital camera noise tends to be very prevalent in underexposed areas in most RAW files.
Notice that this panorama has 7 images. This was not planned. Normally, I would also try to shoot the panorama vertically to record more overall information. However, in a somewhat panicked panorama frenzy, I shot several different panoramas through the magic moments of this sunset. I didn’t know what the light was going to do so I just kept shooting. There are panoramas in my raw library of 6-14 images at all different focal lengths. In retrospect I should have at least had the camera vertically mounted, but that’s hindsight. The light I have decided, was the best at this moment. The panoramas before and after this are just not as dramatic, and this moment was dramatic.
So next I think about what I want to accomplish with the post processing. In this case I am making some adjustments to the overall exposure level and contrast. Besides that I want to darken the sky a little to equalize it with the reflected sky, and then that’s pretty much it besides stitching the panorama together and a pinch of sharpening. Can’t forget dust removal too. I hate sensor dust. Here are the adjustments. I’m not going to go into too much detail as to what each function does, since there are plenty of other resources as to how lightroom’s controls work.
The raw image ready to go in Lightroom Basic contrast, exposure and black level adjustments applied Slight tone curve adjustment Digital graduated ND filters, profile corrections, noise and sharpening
The final result, which I felt captured the essence of what it was like standing there: Central panorama image with all adjustments
I felt like I was between two worlds. The reflection quality was incredible due to the lack of wind. I didn’t adjust saturation / color controls at all. The color is all “straight from the camera”, though there is a natural increase of saturation by darkening the image down a little. I didn’t feel it needed anything else.
A quick synchronize of settings across the 7 images and everything looked good, except for the far right. In that image the Black Mountains had become really black, so I added a grad in the last image of shadows +35 all the way across the frame to feather detail back into the blackness.
Now it was time to stitch. I exported full size 16-bit TIFF files of each of the 7 images and had Autopano Giga look at the folder. Autopano Giga's automatic panorama stitch
In just a few seconds Autopano Giga produced a panorama that was 99% of where I wanted it to be. I ended up exporting the panorama setup to PTGui Pro to do a couple of fine tweaks. I probably could have done the tweaks in Autopano, but I’m not as familiar with it. I used PTGui since before you could automatically generate any points at all. I added a couple control points, re-centered and rotated the panorama slightly to try and keep the horizon as centered and straight as possible. Here’s a screenshot of PTGui Pro showing where the stitch points are:
PTGui showing stitch pionts
I love that Autopano Pro can export setups to PTGui, which I can then tweak.
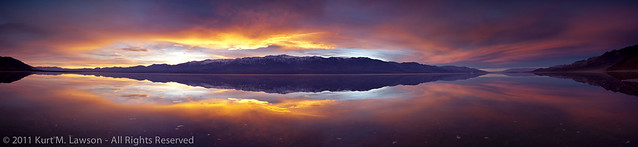
I think the end result is better. Here’s the original (click for bigger):
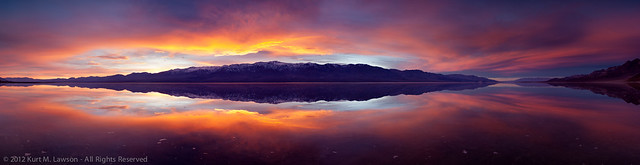
And here is my reprocessing (click for bigger):
Summary
So there you have one example of my post processing. I don’t do any content-altering compositing. I will use technology to overcome camera limitations such as dynamic range problems (though none of that tone mapped over-processed HDR stuff) and combining images to make panoramas that were shot at the same time (within seconds of each other). I don’t add a moon to shots that didn’t have it. I don’t replace skies with skies shot at other times or places. I don’t remove trees that I don’t like. I capture and then interpret reality. I’m not out to create a fantasy land visual effects shot. I don’t want to create images that could exist. “Here’s what I saw” is what I want my photography to be, not “here’s what I made up in Photoshop.” This is just my philosophy, and I hope you enjoy my photography as I share it. Not every landscape needs to be retouched as much as your average model shot. Nature isn’t perfect, and neither are my photographs. I hope maybe at least a little that my photography will inspire you to go out and see the natural beauty that is in the world around us. It’s everywhere, you just have to look.
Please comment below and let me know what you think.