We won runner-up in the People and Space category at this year’s
Insight Astronomy Photographer of the Year competition!
The Cable Route of Half Dome at NightTweet announcing our win!
That’s right we WON! I am humbled and honored to say that we won runner-up in the People and Space category for the Insight Astronomy Photographer of the Year. This is incredible! It is a huge honor win second place in this category, competing with so many amazing photographers from all over the planet. Right now I just don’t know what else to say. Below is a write-up of that trip which was just over a year ago. And I say “we” because this photo was a group effort and we all share equally in the resulting images.
So what do you do when your friend proposes a backpacking photo adventure to capture a night hike up the Cable Route of Half Dome with the Milky Way standing tall right above it? Well of course you go. My friend Sean Goebel proposed this idea last year and it was exciting. I had gone with Sean and other friends back in 2014 to essentially re-do my 97 Switchbacks At Night photo of the Mount Whitney Trail but with our small army and 8 cameras shooting digitally instead of with film. The trip was a success, though I never gave it a proper blog write up. Similarly I have not done a proper write up of this trip until now. Our collaboration led to time lapse and stills from our 5 cameras that we employed to capture one of North America’s crown jewels under the spectacular night sky. Wade Meade, who hiked Mount Whitney in the dark for us in 2014, would climb Half Dome in the dark for us on this trip. Above you can see my version of our close-up shot, with an exposure time totaling 64 minutes. More on that later. We were not sure that our luck would hold weather-wise. We were prepared to make two attempts, but in the end we were successful on the first try. Check out the time lapse:
The Cable Route of Half Dome at Night, Wide Edition
The Milky Way:
Milky Way Over the Cable Route
Capturing Half Dome at night with the Cable Route visible meant setting up on the east side. We settled upon Mount Watkins. This 8500 foot granite edifice provided the perfect view, unobstructed just across Tenaya Canyon. From there to the floor of Yosemite Valley is a nearly vertical 4,000 foot drop. The round dome to the right is North Dome, which was too much of a straight-on view for what we were after. In the background center of the image is Glacier Point, which is revealed by all the car lights in the time lapse in the wide view. Olmsted Point, which has similar views of Half Dome, was ruled out as too far away and the view too obstructed by Mount Watkins among other bits of granite and trees.
Google Earth view of Watkins and Half Dome.
As Sean states in the video, we hauled in the end 5 cameras and tripods plus all our assorted backpacking gear and water over a 5 mile hike with 1800 feet of gain up to the summit of Mount Watkins. Two cameras were dedicated to time lapse, and 3 cameras were dedicated to capturing stills, or longer exposures that would be added together to make the stills. For cameras, we had the following:
Canon 6D with Rokinon 24mm F1.4. – Time lapse camera for wide view of Half Dome, Yosemite Valley, and Glacier Point
Canon 5D Mark III with Zeiss Otus 85mm F1.4 – Rented, ridiculously sharp lens getting the close-up view of Half Dome for the time lapse
Canon 6D with Rokinon 50mm F1.4 – Camera capturing vertical images of the Milky Way over Half Dome but also time lapsing to capture the light trail
Sony A7R Mark II with Zeiss 25mm Batis F2 – Capturing long 8 minute exposures for the wide view of Half Dome, Yosemite Valley, and Glacier Point to stack into star trails
Sony A7R Mark I with Zeiss 100mm Milvus F2 – Capturing long 8 minute exposures for the Half Dome closeup view to stack into star trails
For the time lapse cameras we had LiPo (lithium polymer) batteries powering the cameras all night and for the Sony cameras we just had a stack of Sony batteries since those cameras use lots of power. All told, our packs combined between camping gear and cameras totaled over 110 pounds, or about 55 pounds each. You feel that weight in ever step I can tell you! As it became dark, Wade was making his way from the valley floor up the back around Half Dome to get to the start of the Cable Route. We could communicate vie walkie talkie, telling stories and signaling when it was time to ascend or descend. In addition to his headlamp, Wade had a small lantern to help light up the trail around him in all directions as he hiked. There was no one else around hiking Half Dome at night that we could see. He had the whole thing to himself and enjoyed that quite a bit.
Post processing entailed adding the 8 minute exposures together for the sky and light trail, and averaging them for the ground to reduce noise. Grouping lots of images into one Photoshop file so you can combine them as an Smart Object for averaging makes for very large files (more than 10GB) and I am going to save detailed description of that tedious task for another post. My Sony cameras made a lot of noise! But in the end the images speak for themselves.
Here are some more views from along the way.
Daylight view from WatkinsCloud’s Rest (right) and Tenaya CanyonYosemite Valley, 4000 feet belowNorth Dome and BeyondLast Light on Half Dome
In 2005 while driving through the Owens Valley on the way back to Los Angeles from the Lake Tahoe area, I looked out the window of my car at the magnificent crest of the Sierra Nevada Mountains and had a crazy thought. Well, it wasn’t a crazy thought except that for someone like me who had never before climbed a mountain, – I thought it would be great to climb Mount Whitney. This was an idea that would stick in my head for a long time. Slowly, bit-by-bit I would start working towards the eventual goal of standing upon the tallest mountain in the lower 48 contiguous states. Read my writeup of that experience here.
I started doing a number of things to prepare for this goal. I started hiking around in the local mountains of Los Angeles on well-documented trails after picking up a hiking book. I discussed the idea of the climb with a mountaineer friend who had made the trek previously. At his suggestion I eventually enrolled in the Sierra Club’s Wilderness Travel Course in winter 2010. This class really opened my eyes, teaching me important knowledge about backpacking and safety in the wilderness that gave me the confidence to proceed with the plan. We put in applications for the permit lottery that February and I physically started training for the trip. My permit request was denied, but I was later offered a spot on my mountaineer friend’s permit.
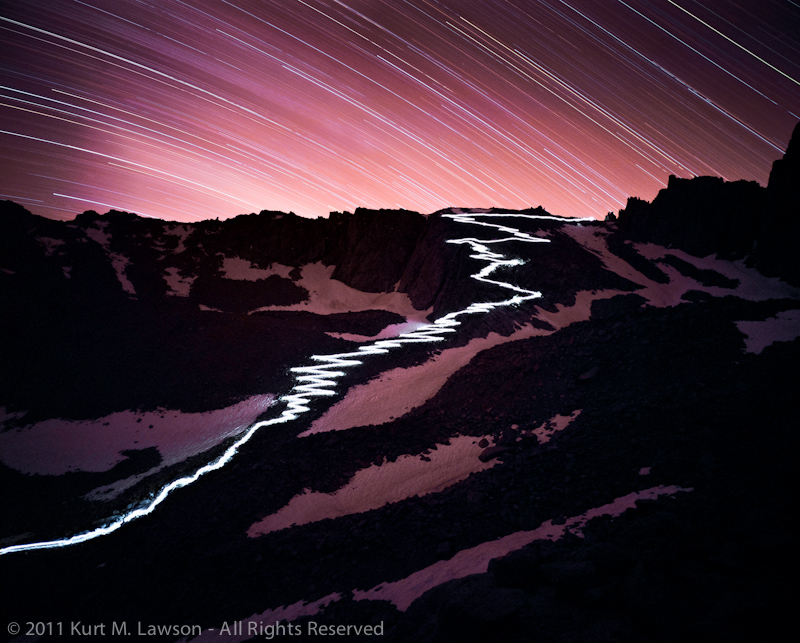
Anyone who does research into the Mount Whitney trail will inevitably come across descriptions of the infamous 97 switchbacks (or 99, or is it 98?). At the high camp along the trail, Trail Camp, which sits well above the tree line at 12,000 feet, you come face to face with this section of trail and for the first time the sierra crest is within reach. For 2.2 miles, rising some 1600 feet, the trail zigzags 97 times in close quarters on a slow (some would say monotonous) trek to Trail Crest. One description I read said to be sure to bring your iPod and headphones for this section. Indeed it was seemingly endless, but when you reach Trail Crest (13,600 feet) you can finally see to the west into Sequoia National Park. Another three miles of hiking and I found myself completing the goal I had set out to do some five years earlier.
On the last morning of the trip, I set my 5D2 upon a rock and shot about 12 minutes of HD video of the day’s hikers making their assault on the 97 switchbacks before we headed out. The next day, back home in Santa Monica, I sped the time lapse up and played it.
I was struck by path the people outlined as they zigzagged up the mountainside. An idea dawned on me. What if I took a long exposure of this trail at night, with some lights to light up the path? The idea was intriguing to me. I had done some star trail photography before, and I knew I could find a way to make it work. I would need volunteers to help though. I talked over the idea with some of my new friends from the Sierra Club class and the project was a go.
I immediately wanted to shoot this on large format film. I had a Mamiya 645 Pro camera I loved, but for this project I thought bigger. This was going to be a herculean effort to pull off at 12,000 feet and I wanted to go big and be done with it. So, my original quest involved 4×5 film. I figured this would be a pretty good tradeoff between some really enormous resolution and size and weight to carry up the trail. There was a bigger problem, however. This was December and Mount Whitney permit applications were due in February. When to shoot? What amount of moonlight? How can I take something fairly unpredictable like five-hour exposures and make them as manageable and predictable as possible?
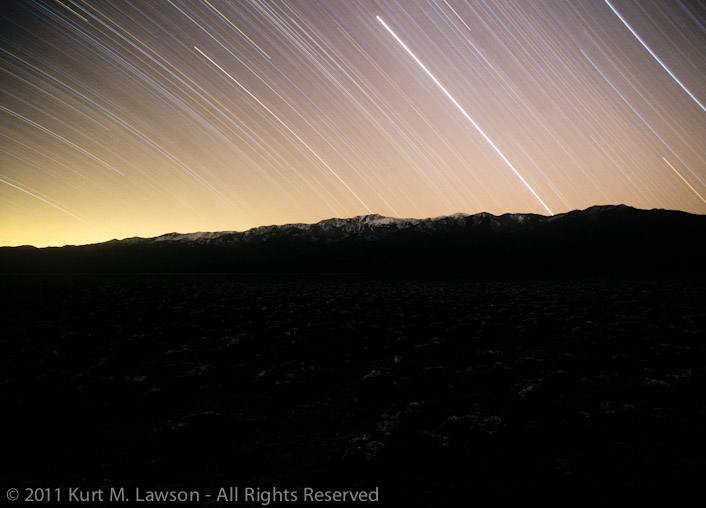
The first question I needed to try and figure out was how much moonlight would be needed to fill in the landscape. I knew the shot would be boring if you couldn’t see where the trail was traveling through. Would starlight alone be enough? I did some tests.
Starlight only at the Devil’s Golf Course in Death Valley
This first round of tests told me I would definitely need some moonlight. With the permit application deadline looming I looked at a chart of all the sunrise, sunset, moonrise and moonset data for 2011. What should I look for in this data that would allow me to scientifically test exposures before the big shoot? I looked at GPS data from my ascent and descent of the 97 switchbacks from a few months before. I saw that it took about an hour and a half to descend from Trail Crest to Trail Camp. I decided to focus on this interval. I would look for at least an hour and a half between total darkness and moonrise. This would allow the descent with a light to light up the trail, and then a variable time afterwards that I could test for to fill the landscape with a rising moon. Since the moon would rise in the East and has a fairly unobstructed path to the switchbacks, it would serve as a giant fill light in the sky. This would be a delicate balance, however, as too much moonlight would wash out the star trails in the sky above trail crest. With the target dates in mind, permit applications were sent in to the Mount Whitney Permit Lottery. You can see the dates ranked by choice for each month. With 200% snowfall the previous winter, August and September were the targets, with the moon dictating the dates. In May we received the results. We had obtained permits for the choice dates in both August and September: there was a first attempt and a backup date.
Now, it was time for testing the exposure. With my demanding day job, I had to find time to get away for long weekends to do nighttime exposure tests. I needed north-south mountain ranges as test subjects so as to be as close as possible to the target range while being easily accessible for testing alone. Death Valley was a great spot for this, since the north-south Panamints were not far from the Sierras and the isolation meant I could safely set up multiple cameras and not have any thought of company – human or animal – disrupting my exposures. I scrambled together as many film cameras and tripods as I could manage to test different film stocks and exposure lengths. I ended up using two Mamiya 645 Pros, a Mamiya 645J, an Olympus OM10 and an Olympus OM1N, as well as once a rental Mamiya 7II.
Being initially focused on 4×5, I settled on an aperture of f/5.6 for the shot, given that most large format lenses don’t get much faster than this. All my tests were done with this aperture after my initial test shot had shown that this produced nice interesting star trails. Online I started researching 4×5 photography and I soon discovered that there were some potential issues with the film moving as the temperature changed in the camera. I would have to somehow tape the film in place. I also would have to rent the camera. Given my lack of large format experience, I became concerned that I wasn’t going to have the time to perfect technique to make it work right in time for the shoot, even though it was ultimately nine months away. I decided then the next best thing would be the largest medium format camera solution I could find. The Mamiya 7 platform became the obvious choice. Compact, lightweight 6x7cm medium format cameras with sharp lenses. If possible, I was also going to take my Canon 5D Mark II kit to take other photographs and to do a digital version of the shot as backup in case something went wrong with the film cameras.
One problem I knew I could be facing was condensation. Dew. This could ruin the photo, and something had to be done to prevent it. To combat this problem, I picked up a Dew-Not. This is a little controller/heater for heating lenses and telescopes to prevent condensation. To power it, I picked up a 9600 mAh lithium ion battery pack from eBay. I tested this in Horseshoe Meadow, a place nearby in the Sierras at almost 10,000 feet. I had seven cameras. The two cameras with the Dew-Not attached had no condensation, while the other cameras fogged up and covered with moisture by the end of the exposure creating a foggy look that would be unacceptable in the final image. I picked the lithium ion battery to save weight. You really feel every pound you carry up to 12,000 feet, so that additional expense compared with NiMH batteries was a no-brainer.
Horseshoe Meadow with dew on the lens
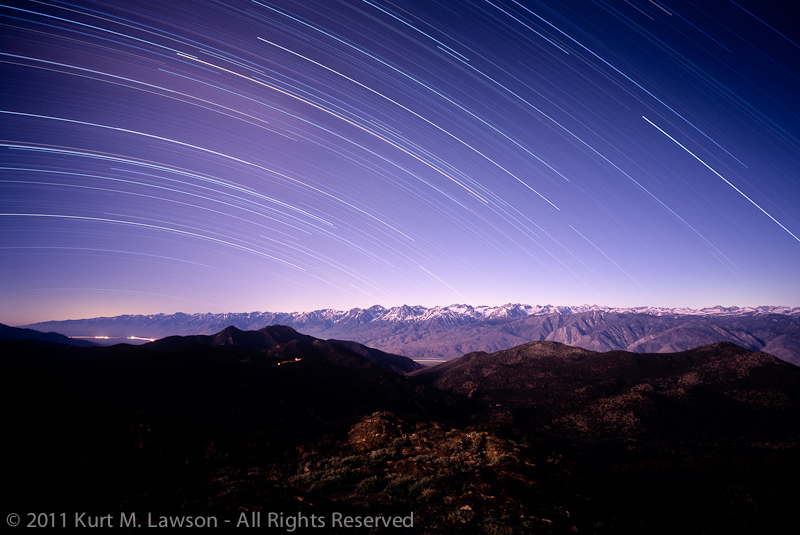
Over the next several months I would make several test trips to Death Valley, the Alabama Hills, Horseshoe Meadow and the White Mountains to do test shots with my array of cameras. With these tests I was able to narrow down the exposure to a target. The exposure would be five hours long starting at the end of astronomical twilight. Astronomical twilight is when there is no longer any sunshine in the sky, only starlight. The moon would then rise 2 hours later to fill in the landscape.
High Sierra Trails – The Sierras from the White Mountains
The same camera, same lens, same film and almost same exposure were used to make the final image. Note how blue the sky is.
By now I was feeling confident about the overall exposure. I had a formula that seemed to work. I had gear to prevent dew. I had the camera picked out. There was one thing that was missing. What was I going to use to light up the trail? A frantic search ensued. I scoured the Internet for the brightest, smallest lantern I could find. Would simple headlamps be enough? Would I need a super bright LED lantern or an even brighter gas lantern? These questions would haunt me in the days leading up to the actual shoot. The biggest problem I had was testing. I needed to go out and test different light sources, but none of my volunteer friends were available when I was. My erratic freelance work schedule meant people who had “real” jobs would not be able to accompany me, and there was the question of where to even do such a test. I needed somewhere on a slope where the camera was between 1500 and 5000 feet away from the light. I just wasn’t able to find an effective location, and was often too exhausted to attempt to do all of it myself late at night in Death Valley, for instance. So, I took a big gamble.
One thing that was clear to me with the light was that it needed to be omni-directional. No matter where the lantern was on the trail, I needed the camera lens to see the light source directly. This would maximize the effect of streaking across the film as the bright source of light itself would be visible. Had I used just headlamps I fear I would have been at the mercy of what direction the headlamps were facing, resulting in reduced intensity when facing away. I didn’t want a dotted line.
Asking around online, I read that the light of a bright star in the sky is approximately 100 lumens. The brightest LED lantern that I ended up finding was this one. This lantern weighs in at 580 lumens. I figured a star travels slower than the people were going to be through the exposure, so the light produced by a this lantern would be enough to make a strong streak through the entire 97 switchbacks and have it read properly on film. I purchased two of them. Each requires 8 D batteries for power. This was going to be fun to carry up to the top.
All the originally planned gear, ready to be packed and loaded
With all the gear figured out, there was a question of where to shoot the photo. Scouring Google Earth and any picture I could find on Flickr and Google Images, there was a clear choice for the proper field of view required. Wotan’s Throne. The summit of this nearby rock seemed to be the nearly perfect place. This posed certain problems, however. Physically it was another 750 feet or so of elevation gain involving class three rock scrambling. How could the camera be safely started and stopped in the night from there? These questions would not be resolved until the day of the shoot.
First light on Mt. Whitney. Wotan's Throne in shadow
For this expedition I had a lot of help from friends. In the planning of the expedition, providing advice and wrangling the team that would ultimately help me carry out the shot, friend Kim Homan was a tremendous help. She and friend Michelle Orem were the first two people to join in. Kim helped me keep things safe and provided insights that greatly helped. Brad Anderson and Michelle assisted with a scouting climb to the Trail Camp area on July 17th. Stacy Sanchez and Koichi Minamizuka volunteered to carry the lantern up and down from Trail Crest, after they had climbed to the summit of Mt. Whitney earlier in the day! Bill Becher lent his help in carrying gear and mountaineering expertise. My good friend Ben Keil helped carry gear and summited Mt. Whitney with Stacy and Koichi. A. Michael Dobbs accompanied me on one of my test exposure runs, helping to move gear to Horseshoe Meadow and back in the middle of the dark. Thanks too to Dwain Roque for providing some consultation and lending me some gas lanterns, even though I ended up going the electric route. A huge thank you again to all of you.
Finally the time of the shoot arrives. Koichi and I had gone and spent some time in the White Mountains to help acclimate to the altitude a few days early. We then moved over to the Mount Whitney Portal area to meet up with the rest of the team. Our Mount Whitney Permits were three day permits, for August 20, 21 and 22. This was to allow for one day to hike to Trail Camp. On day two Koichi, Ben and Stacy would climb to the summit while the rest of us hung out exploring, acclimating or setting up for the shot. That second night we would do the shot. Day three we would pack up and hike out and have some celebratory drinks. Everyone would carry four to five pounds of gear except for me. I would carry 10-12 pounds of gear.
Then disaster struck. With everyone finally assembled I began to feel ill. Despite trying to acclimate early, I began to feel sick at our camp in Whitney Portal, elevation 8300 feet. By dinnertime I couldn’t hold anything down. I continued to feel ill into the night and on through the next morning. When I got up, I decided the best thing to do was for me not to proceed up that day as planned. My crew volunteered to take gear up to Trail Camp anyway in case I felt better, and I resolved to spend some time down in the valley in the higher air pressure and then attempt to join them Sunday morning. So, I watched my crew depart without me on Saturday morning, and headed down to chill and try to feel better. Since things were uncertain, I stripped down the gear. No more 5D, only 1 tripod. Just the bare minimum gear to get The Shot was taken up. I radioed that evening I was feeling better and would be making the trek up the next morning.
Alone, with a little help packing my overstuffed backpack from Brad Anderson and Val Nathan, who were getting ready to do their own assault on the East Buttress of Mt. Whitney, I headed up with my 52 pound load. Seven hours, six miles and 3700 feet of gain later I arrived triumphantly at Trail Crest and met up with the rest of the crew. After dinner, Kim, Bill and I headed up towards Wotan’s Throne and Stacy and Koichi headed up towards Trail Crest with the lantern. While they were making their ascent, we scouted out a place for me to camp and set up the photo. We climbed 265 feet up before settling on a spot where I could set up the cameras and sleep nearby, allowing for an unobstructed view of all 97 switchbacks. Kim and Bill helped me set up camp and secure the tripod with rocks and tie lines and then they headed back to camp below. I was alone with my gear and my brave friends were climbing the switchbacks for a second time this day.
Two Mamiya 7II cameras with 43mm lenses were used. My Gitzo GT3531s tripod was tied down with a bag of rocks and tie lines to secure it against the wind. More tie lines and zip ties anchored a Gorillapod Focus with the second Mamiya 7II off the side of the Gitzo. Cloth generic cable releases taped down with duct tape provided shutter control. The Dew-Not heater was installed and engaged with the Lithium Ion battery.
Framing the shot. Photo by Bill Becher
Checking my phone, I pulled up The Photographer’s Ephemeris to check actual astronomical data for my location. I had roughly planned start and stop times ahead of time, but that was using military data from nearby Lone Pine. At 9pm, I opened the shutter. Shortly afterwards, Koichi and Stacy turned on the lantern at Trail Crest. Instantly I knew the streaking trail through the switchbacks would be ok. The lantern was bright!
At this point I was not feeling well again. My stomach was in extreme knots. I was dry heaving. I couldn’t do much other than watch the light and feel ill. After about 45 minutes of watching the lantern I had to lie down in my tent to keep warm and try to relax. Every 15 minutes I would peek out at the light to check on my friends. Their radio had failed so I couldn’t talk to them. After about two hours they had made it back to Trail Camp. I watched them arrive down there and then chatted briefly when they got a hold of one of the other radios. I passed out until 1:00 am when I awoke to check on the cameras. I peered out and clouds had started to roll in. I had planned to keep the exposure open a bit longer, but closed the shutters a little early about 1/2 hour later for fear that the clouds would wash out the star trails. I turned off the dew-not heaters and attempted to sleep. I did not sleep well. The next morning I got up to a spectacular scene. The light was fantastic. I found myself really wishing I had my 5D2 with me. I snapped away with my Canon s95 pocket camera. I awaited rescue from Bill and Kim who arrived to help me pack out from my solitary camp. I was feeling much better.
Spectacular light the next morning
Things look a lot different in the morning alepnglow. Can you even make out one of the switchbacks here?
The trek down was uneventful. I was filled with relief and anxiety. We had done it. But, with film we would not know the results until I got the it back from the lab. Back at the Whitney Portal Store we all had a burger and a beer in triumph, and then broke apart for our respective drives back home.
Film back from the lab
Tuesday at noon I had the film back. The lantern path was a success. A pure white streak outlined the switchbacks. The rest of the image was pretty dark, however, darker than expected. I raced home to scan it immediately. I put the film into my Nikon LS9000ED and checked it out. It looked like it could be amazing, but the first image was a bit blurry. I was concerned. I scanned the second exposure. The first one had been the one on the Gorillapod. The second was the one on the Gitzo directly. It was sharp. I was relieved! It looked great, however the path itself looked like it had flared the lens. I sent the film off to get professionally drum scanned at James Beck Digital. This new scan blew me away. The shadow areas were more filled in and the strange flared halo from the trail was gone.
At last, it was complete. Months of planning had paid off. A herculean effort from my team had helped me achieve the image I sought to achieve. The color was a surprise. My other tests had produced more blue, but the result is striking. I love it.
Compare with the daylight picture the next morning just above.
Once more I have to say thank you to my friends who volunteered time to help out on this quest. It was a fun adventure, and I think the result speaks for itself.
Last night I was in Joshua Tree National Park again. This time it was not a backpacking / photography expedition. However, as I am compelled to do, I brought my camera gear along. At one point I realized that I might be able to take some photos of our camp. I also realized that our huge camp fire was lighting up the surrounding rock walls. So, I set the camera on my tripod and let it go to work. I was blown away when I saw the results!
Firelight and the half moon
“Wow!” is what I thought when I viewed this on the tiny LCD monitor. Blown away, I did a second exposure with far less desirable results. Despite the identical exposure, the fire died down significantly and there just wasn’t enough light. So, I decided to try something else. I set the camera up again, knowing that the moon was soon to disappear behind the rocks. This time after I clicked the shutter I beefed up the fire with the help of a fellow camper and spent the next 12 minutes painting the rocks with the fire as I constantly added bits of bright burning cardboard and additional wood.
The result? The starburst effect of the moon shot with a small aperture (f/16) just as it dipped behind the rocks.
Moonburst and firelight
After this I gave up on this composition and tried a few others near the fire. These shots combine some moon light (as the moon was still visible from the other side of the campground) with the fire light.
Red rocks and star trails IRed rocks and star trails II
Shortly after this last one I the last bit of moonlight faded from the foreground rocks. I elected to head for my sleeping bag, but discovered there was enough light (and I had just enough energy) to try one more purely moonlit shot from a few hundred feet away from camp.
Moonlit star trails at Joshua Tree
And finally, here are the two best shots of camp that led to all other night shots from the trip.
10 Seconds at camp8 Minutes at camp
Yours truly can be seen in the second one, semi blurred, somewhere in there.
I have now visited Joshua Tree National Park twice. Contrary to what one might expect from the desert, both visits (February and October) have involved rain and lightning. I just yesterday returned from this second trip to Joshua Tree, and ahead of the other pictures I thought these deserved their own post. I have always wanted to shoot lightning pictures. I have never had the opportunity to do so from a safe distance. As luck would have it, yesterday morning afforded me the opportunity I had long waited for. I was on a backpacking trip to summit Quail Mountain, the highest peak in the Little San Bernardino Mountains. Starting around 4am, a huge light show played out to our east. I just had my 5D Mark II, 24-105mm lens and a tiny Gorillapod Focus (with the ballhead X). A rock outcrop provided a high platform for this setup so I could get a good view of the action from camp. I kept the camera close enough that I could keep an eye on it from my tent, and run out and fetch it if it started to rain, which it did twice.
Thunderstorm and Star Trails at Joshua Tree
Wow! That’s what I thought when this exposure finished. I decided that I would pretty much spend the rest of the morning taking pictures instead of sleeping. Who needs sleep when you’ve got this going on?
Thunderstorm and Star Trails Take 2
As the storm moved north it got closer to us. The lightning became more and more visible. The storm was so electrically active that there was almost a strike or cloud to cloud bolt every second, with a faint distant roar of thunder. It was really quite a show.
Pre-sunrise glow with lightning
Here the sun was beginning to rise on the distant horizon. The horizon was 99% blocked by the storm except for a brief time where I could see a little red on the left.
In this last one the lightning almost seems to wrap around a cylinder of rain. All in all I’m ecstatic about my first ever lightning pictures. What an amazing trip this was!
Finally, here is a star trail picture I took earlier in the evening when the skies were clear.
Star Trails at Joshua Tree
Which lightning picture is your favorite? Let me know in the comments please!
Wow! Really that is the first thing that comes to mind when I think about this trip. It was truly amazing. My first ever summertime backpacking trip really rocked my world. We went to an area called Big Pine Lakes to camp. This is a wonderful set of lakes some of which are fed by glacial waters from higher up. The glacial sediments suspended in the water make the water an incredible shade of blue. It’s just amazing to see.
Not a bad place to camp!Along the banks of the North Fork of Big Pine Creek
From the trailhead, we hiked 6 miles or so to our camp at Third Lake. From here, at around 10,000 feet, we would camp and set out for the Palisades Glacier the next day.
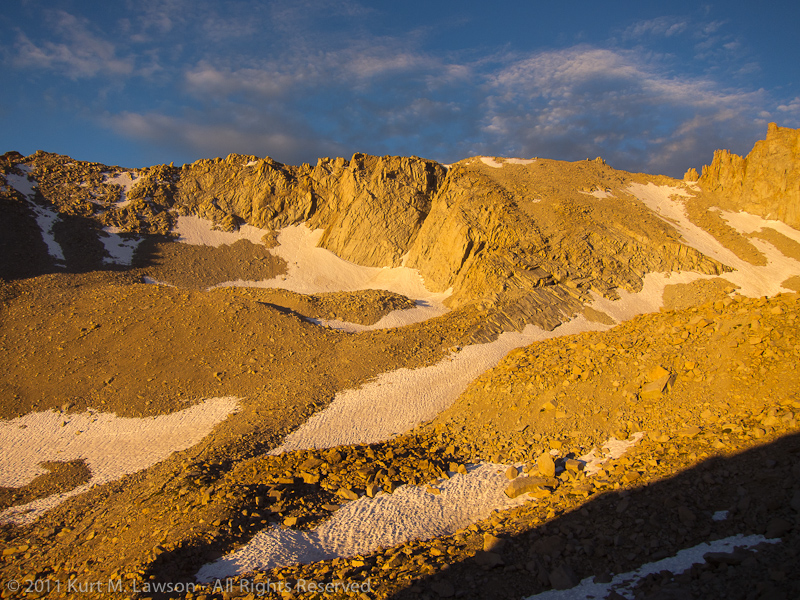
Sunrise over Third LakeSam Mack Meadow
Sam Mack Meadow is a beautiful stopover on the way up to the glacier. We stopped here to take a few moments to refill our water supplies before heading on up. Elevation here is about 11,000 feet.
Sam Mack Meadow from aboveFirst, Second and Third Lakes from above
As we climbed, we got a good view of First, Second and Third lakes (top to bottom in the above pic).
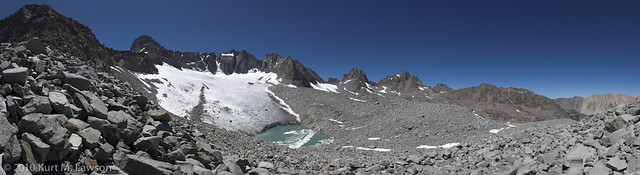
Snow at the base of Temple Crag's faceThe Palisades Glacier
Finally, we got the view we were working towards. The Palisades Glacier. This glacier is the largest in the Sierras, and they are amongst the southernmost in North America. This was a truly breathtaking sight. Our view was from a ridge above the terminal lake at about 12,300 feet. We were essentially standing on the terminal moraine of the glacier when it extended much further.
Click on the above panorama for a larger version on flickr.
Above the Glacier are several 14,000 foot peaks (and some a little bit less), including North Palisade, Starlight Peak, Thunderbolt Peak, Mount Sill and Polemonium Peak. It’s a magnificent area.
North Palisade (left) and Starlight PeakSunrise reflections in Third Lake
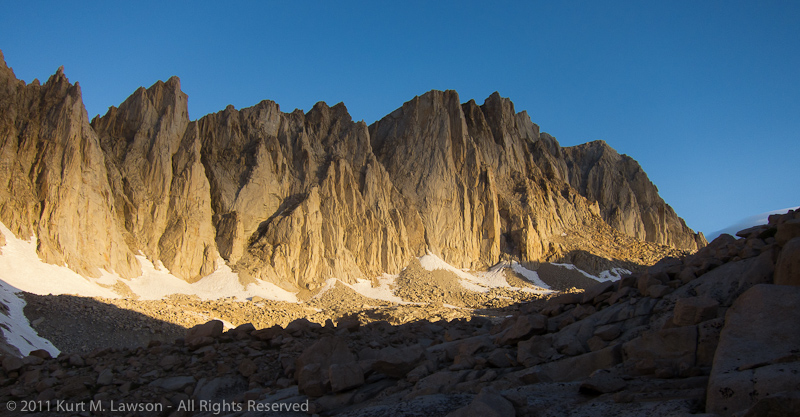
I was really captivated by Temple Crag, which loomed above our campsite. I could probably spend a week photographing this single mountain.
Clouds casting shadows directly onto nearby Temple CragTemple Crag reflected in Third Lake
Finally, the Perseid Meteor Shower was happening at the time we were there, and I tried to capture a few of them while looking at the amazing Temple Crag.
Perseid Meteor over Temple CragTent Trails
It was an amazing trip. I hope to go back and explore the glacier up close, something our group voted not to do. It really was some of the most amazing scenery I have ever seen with my own eyes.


 and Starlight Peak")


